Debtors Module Routine Procedures
This webpage provides some guidance for regular everyday and end of month procedures for the Debtors module. These regular functions have been facilitated for you in the "Everyday & End of Month" page tab.
Daily / Weekly Procedures
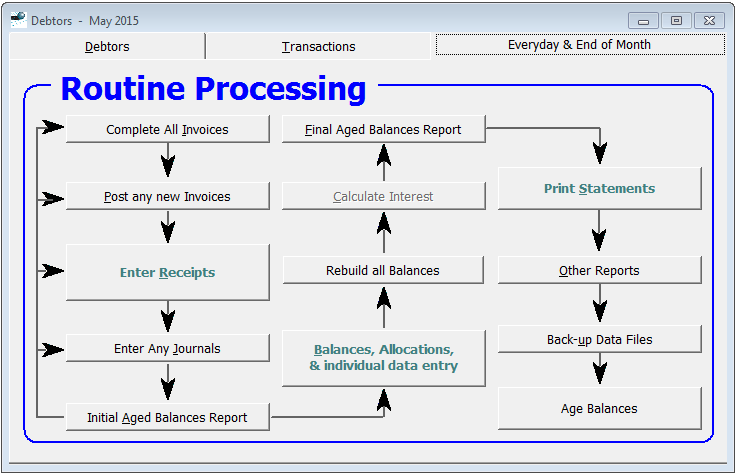
- Three of the buttons in the flow-chart are slightly larger and have coloured text for their caption. This is because you tend to use these considerably more often than the others, and throughout the month (rather than just at month-end).
- Receipts should be entered regularly, to keep your Debtor Balances and transaction history up-to-date. We recommend that you use the facility to "Enter a batch of Receipts" even if you have only one, because the interface is more efficient and informative.
- You can make ad hoc enquiries on balances and transaction history for
individual Debtors whenever required. This can be done from the
"Balances / Allocations..." button, or using the drill-down facilities from
the Address Book or Jobs modules. Useful things you can also do
while the "Debtor Balances" window is open are:
- Click on the "More..." button (at the top of the bottom-right quadrant) to view more comprehensive transaction details in a separate (slaved) window.
- Use the "Other" page to enter: a special email address for sending statements, a special message on statements for just that Debtor, and their normal bank account details (if you use the facility to print a Banking Deposit for that day, when you enter a batch of Receipts).
- The "List" page is useful for scrolling to another Debtor. Note the drop-down filter facilities at the bottom of the "List" page. The "Balances" drop-down is particularly useful (e.g. "Non-Zero Only" will exclude all inactive Debtors from the list).
- It is worth mentioning several items in the "Debtor Balances"
menu (that is added to the Main Menu at the top of the screen when the
"Debtor Balances" window is selected):
- "Edit Client Details" opens a slaved Address Book window for the current Debtor (from which you can drill-down to other client history).
- "Fix Errors in transaction entry" allows you to simply fix typos or dyslexic entry of an amount, rather than having to raise reversing and correcting entries.
- The "Allocations" sub-menu has some useful tools to check for and fix allocation issues for that Debtor (which may be causing weird problems in the aged balances).
- You can send an up-to-date statement via email if there is a special requirement to do so. (It is usually easiest to send one-off statements from the "Debtor Balances" menu when viewing the individual debtor concerned.)
End of Month Procedures
- As mentioned in the webpage "Time & Cost Routine Procedures", if they are not rebuilt automatically overnight (which is what we recommend in a multi-user environment especially), it is a good idea to rebuild all your indexes (see "File > Reindex > All FIles" menu). This will ensure maximum integrity of the reports and invoices / statements.
- It is good to ensure that all receipts (and journals) have been allocated to their respective invoices. Do this from the "Debtors > Other > Allocate Outstanding transactions" menu at the top (or "Other" button on the "Transactions" page).
- Other integrity checks that may be useful at the start of your Month-End
process and can be run from the "Debtors > Other > Data Integrity Checks"
menu at the top, are:
- Check for Duplicate Debtors
- Check Allocation Integrity
- Check Open Item Balances
- The flow-chart on the "Everyday & End of Month" page tab, leads you through most steps at month-end.
- You can use the "Enter any Journals" facility to enter write-offs. But it is usually easier to do this from the "Debtor Balances" window, because you can then easily verify the results immediately.
- The "Initial Aged Balances Report" helps you spot any problems in allocations (negative amounts in any columns). If any balances seem weird, it is a good idea to run the "Allocation Integrity Check" (from the "Other" menu on the "Transactions" page, or from the "Debtors > Other > Data Integrity Checks" menu at the top of the screen when the main Debtors module window is selected).
- "Calculate Interest" (on overdue balances) is only enabled if you have turned this facility on
- Do not "Age Balances" into the new month until you have sent out all statements dated as per the end of the old month!!! However, it is a good idea to do this as soon as possible after the last statement has been sent, so that balances will then be up-to-date (i.e. in the new / current calendar month) when you view them on-screen going forward over the remainder of the new month.
- When you are ready to send out month-end statements to respective
debtors, it is usually a good idea to do the email ones first, and a batch
of printed ones later:
- If you want to cross-check the balances and activity of respective debtors before sending them a statement, it is best to do this from the Debtor Balances window. (You can check the "Last Statement" date to avoid inadvertently sending a second one.) Select the "List" page, and at the bottom-right select "1 Months and over" (or "2 Months and over") in the "Balances" drop-down. This will filter the debtors list accordingly. You can then click back to the "Balances" page, and use the "More..." button to open a slaved transaction window. When you are happy with the debtor's info, you can preview a statement if required, using the "Debtor Balances" menu at the top, and email or print a statement from the same menu. The "Page Down/Up" keys will let you step to the next debtor that matches the filter you have specified.
- While you can email or print single statements from the "Print Statements" pop-up menu, it is usually better to do this from the Debtor Balances window as just described above.
- If you are comfortable with the aging of respective debtors as shown in the Aged Balances Report, then it is more efficient to email and print batches of statements using the facility to "Print or Email a Batch of Statements" from the "Print Statements" pop-up menu. Use a value of "Yes" or "No" in the "Have Email" filter setting in "Step 2" and the settings in "Step 3" (tick "Unprinted Statements only") of the wizard, to help remove clutter from debtors that are not applicable for the batch you are running.
- The "Report of Unprinted Statements" (from the "Print Statements" pop-up menu) provides a good safety-check that you have indeed sent a statement to all applicable debtors.
- Once you have sent away your last month-end statement, use the remaining buttons of the flow-chart (on the "Everyday & End of Month" page) to produce your regular admin / management reports, and to roll the Debtors Ledger into the new (current) calendar month.
End of Month Admin / Management Reports
As with all our software, the Debtors module, has an array of management reports, with considerable flexibility provided by the respective report wizards. The more commonly used ones are:
- "Aged Balances Report" (Run this before you "Age Balances" into the new month)
- "Daily Banking Report" is useful as an audit report for all bankings in the month (and for checking where you last got up to, if you have fallen behind on data entry of receipts).
- "Daily Summary of Activity" provides a good summary of all activity in the month
- "Debtors Control Report" and "Summary of Activity by Debtor" are similar to the "Daily Summary of Activity", but not broken down by date. They provide a good summary for the month - or the entire financial year (at year-end).
- The Payments based GST report is very useful if you prepare your own GST returns (on a "Payments Basis").